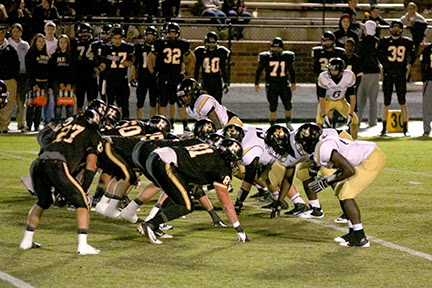
The question I commonly am asked is “what setting should I
use to shoot my child playing this or that sport?” I wish the answer was as simple as use this
or that setting and you’ll get awesome photos!
But it’s not. First of all we
need to start by asking ourselves a few questions.
·
What is my goal?
Answer: To capture clean, crisp photos of my child in action.
·
Do I want to show motion or freeze motion? Answer: Typically we want to freeze motion.
There are a few variables
to take into consideration when shooting sports, so let’s look at them.
TIME OF DAY
Photography is all about light. What time of day your child plays their sport
is very important. Do they play in the
day or evening? As you know, there is more available light
outside on a sunny day than there is in the evening. Your daytime images are looking pretty good,
but how do you keep your evening images from being blurry?
WILL I BE SHOOTING
INDOORS OR OUTDOORS?
Again, this is very important because we are not only
dealing with the amount of light we have to work with, but the color of the
light as well. The light inside a gym
for a basketball game or volleyball game can make your photos look very
green. I can hear you thinking, how did she know my basketball and volleyball photos are green?
WHAT LENSES ARE IN MY
BAG?
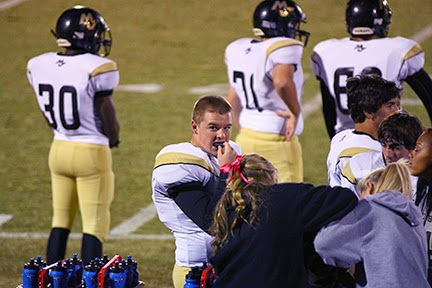
Having the right lens in your bag can make or break your
ability to shoot good sports photos. If
all you have is the kit lens that came with your camera (often an 18-55mm lens)
you might not have very much reach to isolate your subject. You will end up photographing the entire
field or court and your images will all look similar to one another. Many
people find this out rather quickly and run out and buy a telephoto lens, typically
the 75-300mm zoom lens. You put it on
your camera for the first time and get all excited about your new ability to
zoom in and isolate your subject on the field.
But wait! Now your pictures are
blurry. What’s going on?
Let’s unpack these 3 variables and learn to take better
sports photos.
Time of day: Shooting outdoors in the morning or afternoon
on a nice sunny day usually results in pretty crisp and clean images. Why?
Because there is an abundance of light to work with and the camera will
often times select a fast shutter speed
and narrow aperture to let just
enough light into the camera to get proper exposure.
Whoa, back up..Shutter speed, aperture, now you’ve lost me.
Shutter
speed is the amount of time the
shutter (little doors) within the camera stay open to allow light to pass
through and land on the image sensor to make an image.
 Aperture is the size of the opening inside the lens
that allows light to pass through. Think
of Aperture like allowing light to enter into the camera through a hole the size
of a straw or the size of the mouth of a milk jug. Or like the pupil of your eye. When you are outside on a sunny day your
pupil becomes small to control the amount of light entering your eye. When you come into the house or enter a dark
room, your pupil dilates or opens wider to let more light in so you can see in
the dim room. That’s exactly how
aperture works!
Aperture is the size of the opening inside the lens
that allows light to pass through. Think
of Aperture like allowing light to enter into the camera through a hole the size
of a straw or the size of the mouth of a milk jug. Or like the pupil of your eye. When you are outside on a sunny day your
pupil becomes small to control the amount of light entering your eye. When you come into the house or enter a dark
room, your pupil dilates or opens wider to let more light in so you can see in
the dim room. That’s exactly how
aperture works!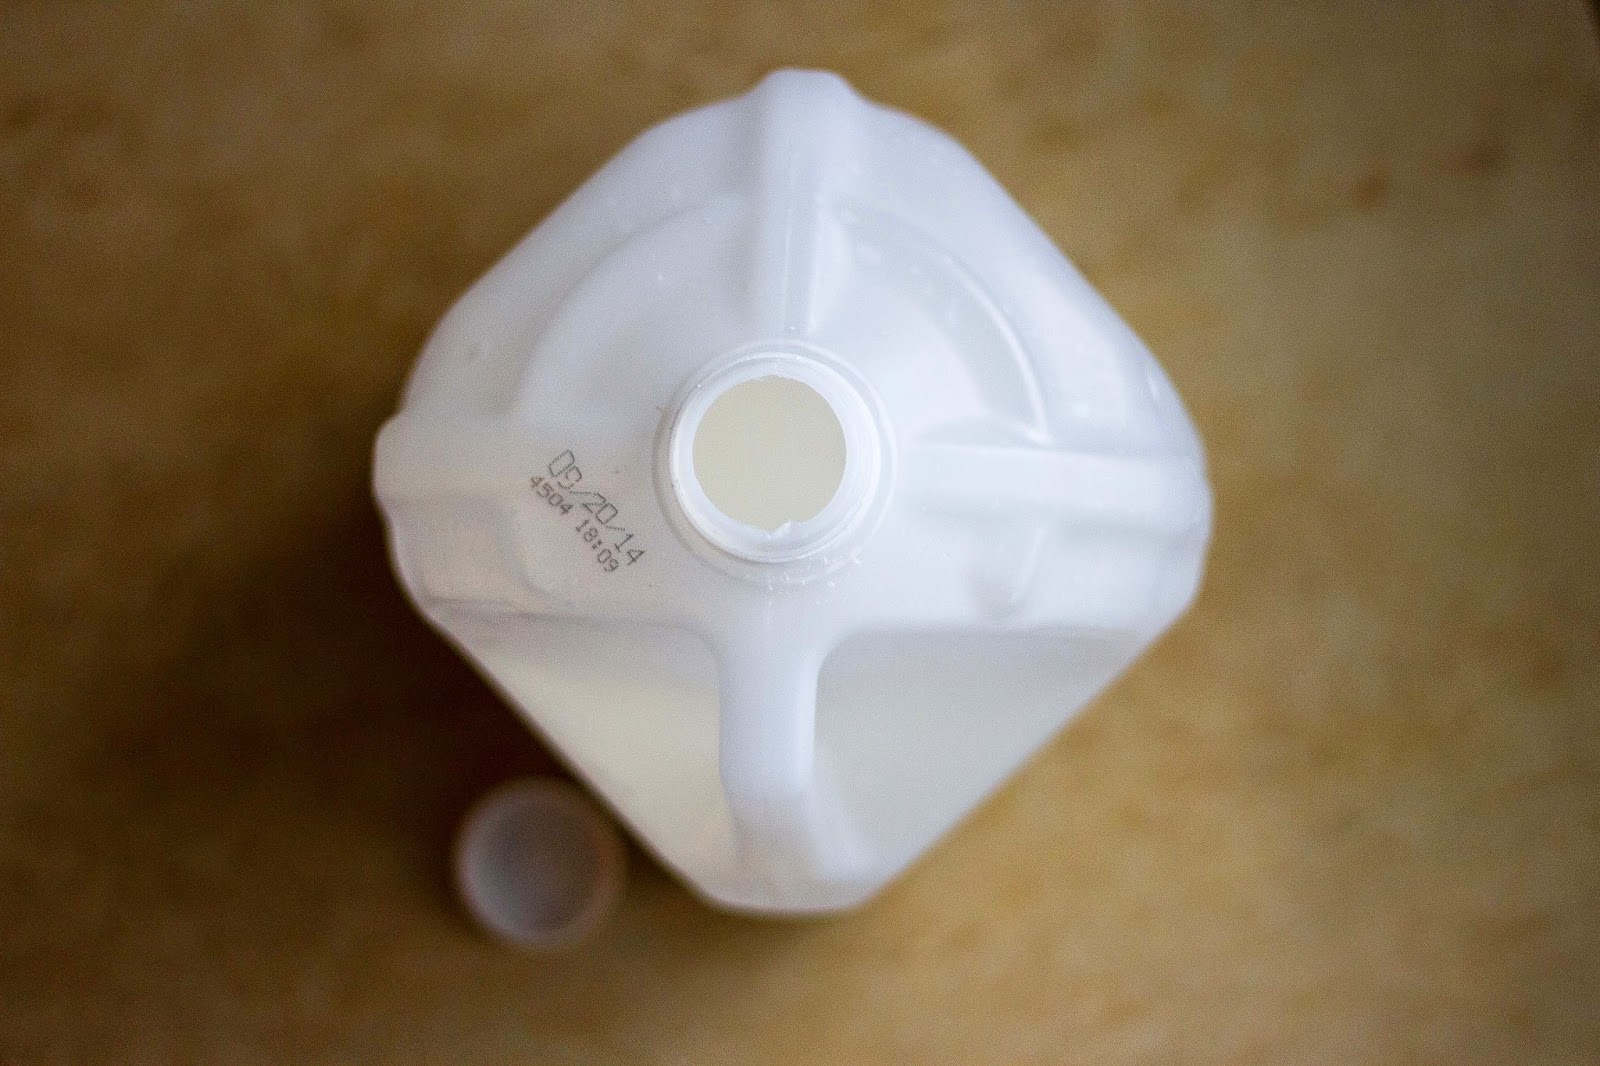
So back to time of day.
If you are shooting in AUTO MODE in the evening or indoors and there is
not much available light to work with, your camera will probably pop up the
flash. That’s all fine and good if your
subject is right in front of you and you want to make a portrait of them after
a game, but not if you are up in the stands at a football game and want to
shoot your child out on the field. The
flash will illuminate the heads of the people in front of you because flash
only reaches about 12 feet from the camera.
The field will become darker because the shutter does not have to stay
open long when using a flash due to a flash being a bright light source. To avoid flash you can turn your camera to P
- Priority Mode. This mode works a lot
like Auto, but it lets you tweak some settings.
It will not pop the flash up for you, you have to manually pop it
up. However, I don’t recommend P – Priority Mode for sports, especially those shot in the evening.
What I do recommend is Aperture
Priority Mode - AV (Canon) A (Nikon) or Shutter Priority Mode - TV
(Canon) S (Nikon).
Let’s explore both of those camera modes.
 Aperture Priority Mode
Canon: AV: Stands for Aperture Value
Nikon:
A: Stands for Aperture
In this mode you make the decision on what aperture you want
your camera to use and the camera will automatically set the shutter speed. (Use
caution in this mode, because your shutter speed can drop too slow and cause
motion blur.) Often a sports
photographer will set the aperture to the widest setting for the lens they are
using. In the case of the 75-300 mm telephoto
lens that would be f/4. Why do they do
this? They want to enable their lens to
let in as much light as they possibly can.
Now the common 75-300 mm telephoto lens is a variable aperture lens. Meaning when you zoom the lens to magnify
the image, the aperture will vary between f/4 and f/5.6. We
will talk more about this later in lens choices. Another reason a photographer might choose
the largest aperture opening is that the aperture controls depth of field. Objects
further in the background begin to blur or become softer. This will allow you to isolate your child and
let the crowd, other players or fence behind them drop out of focus.
Shutter Priority Mode
Canon: TV: Stands for Time Value Nikon: S: Stands for Shutter Speed
Canon: TV: Stands for Time Value Nikon: S: Stands for Shutter Speed
When I shoot sports I like to put my camera in Shutter
Priority mode. I ask myself this
question, do I want to show motion or freeze motion? Since I am trying to freeze motion I will choose
a shutter speed that is fast enough to freeze motion. The average shutter speed I start with is
1/500 of a second. If I am shooting on a
bright sunny day I can certainly set it faster!
If I am shooting an evening sport and I just can’t get enough light to
shoot at 1/500 I will go as low as 1/350, but not any lower.
ISO
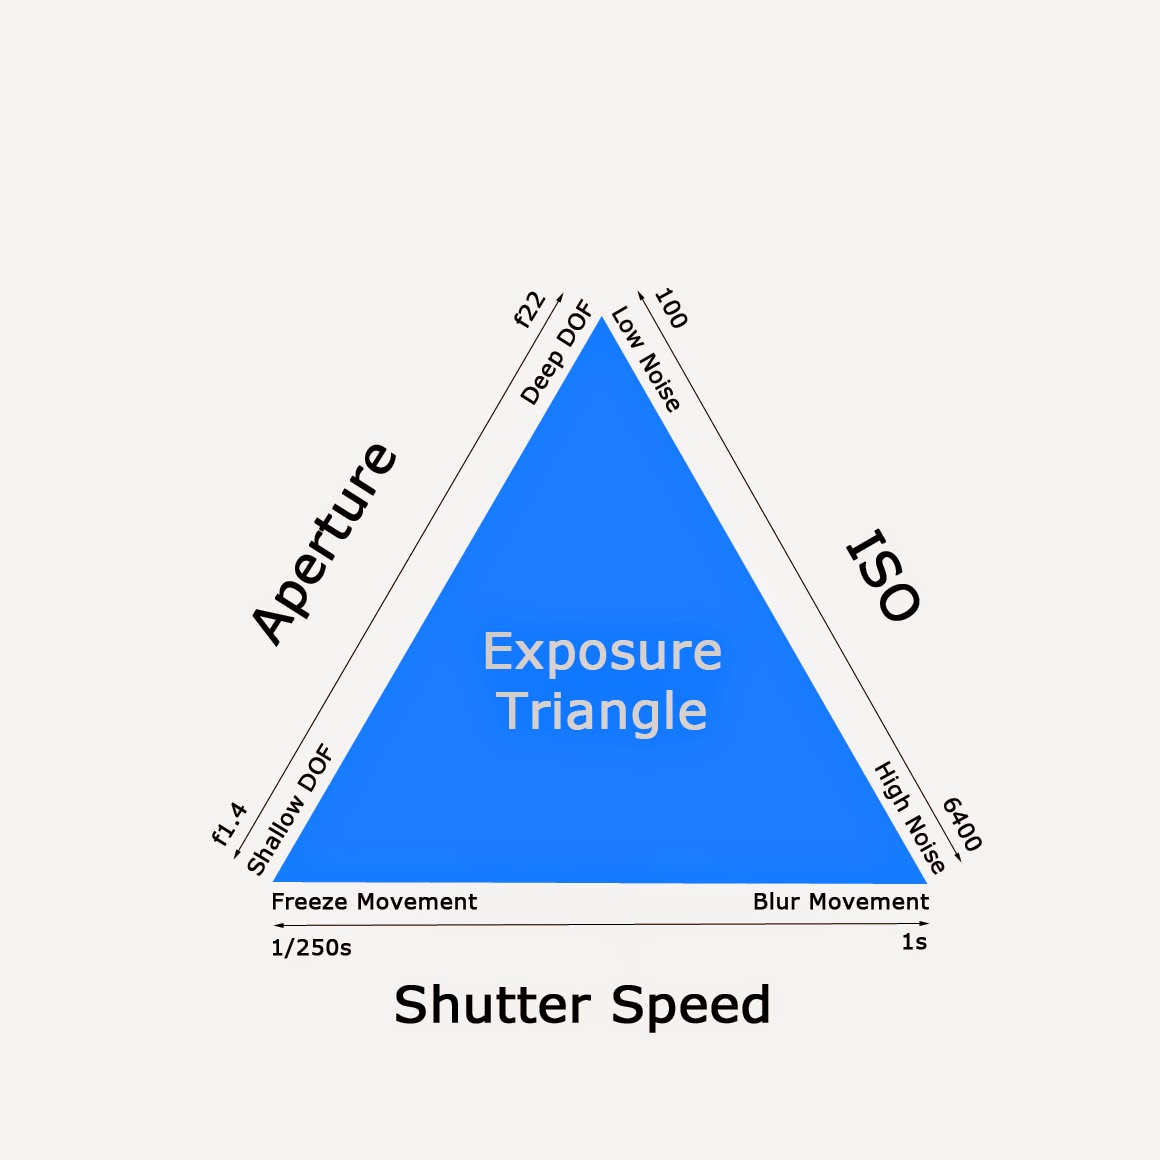 Now I want to introduce to you a little friend of mine named
ISO.
He is part of a family called The
Exposure Triangle. There are 3
parts of The Exposure Triangle: Aperture, Shutter Speed and ISO. ISO is a feature on your camera that controls
how sensitive your camera’s sensor is to light.
Back in the days of film, ISO referred to film speed. ISO 100 film was great for shooting outdoors
on a sunny day. ISO 100 on a digital
camera is great for the exact same thing!
ISO 400 and 800 were faster speed ISO films. They enabled the Photographer to shoot with a
faster shutter speed during low light situations. Today on our modern digital camera ISO 400 is
great for shooting outdoors in the shade because you can set a faster shutter
speed in lower light, or on a cloudy day or in the house during a bright sunny
day with the window shades open and light flooding into the room. ISO 800 is great indoors in the evening before
sunset outside when there is still plenty of light to see. Why, because again,
you can use a faster shutter speed.
Digital ISO’s continue to double in number and as the number gets higher
the sensor becomes more sensitive to light.
ISO 800 doubles to 1600 and then to 3200 and to 6400 and so on. Depending on the age and hobby/professional
level of your camera will determine the highest number of ISO you can use. And yes, some cameras do have ISO in 1/3 stop
increments, but for the sake of this post we will use full stops.
Now I want to introduce to you a little friend of mine named
ISO.
He is part of a family called The
Exposure Triangle. There are 3
parts of The Exposure Triangle: Aperture, Shutter Speed and ISO. ISO is a feature on your camera that controls
how sensitive your camera’s sensor is to light.
Back in the days of film, ISO referred to film speed. ISO 100 film was great for shooting outdoors
on a sunny day. ISO 100 on a digital
camera is great for the exact same thing!
ISO 400 and 800 were faster speed ISO films. They enabled the Photographer to shoot with a
faster shutter speed during low light situations. Today on our modern digital camera ISO 400 is
great for shooting outdoors in the shade because you can set a faster shutter
speed in lower light, or on a cloudy day or in the house during a bright sunny
day with the window shades open and light flooding into the room. ISO 800 is great indoors in the evening before
sunset outside when there is still plenty of light to see. Why, because again,
you can use a faster shutter speed.
Digital ISO’s continue to double in number and as the number gets higher
the sensor becomes more sensitive to light.
ISO 800 doubles to 1600 and then to 3200 and to 6400 and so on. Depending on the age and hobby/professional
level of your camera will determine the highest number of ISO you can use. And yes, some cameras do have ISO in 1/3 stop
increments, but for the sake of this post we will use full stops.
So now that we know
what ISO is, why is it important and when should I use it?
Why? You may have
noticed that when I spoke of ISO I used the term “because you can use a faster
shutter speed in lower light” more than once.
Shutter speed as we learned earlier stops motion. Whether I am chasing a small child, or
shooting a runner on a track, I want to have a clean and crisp image. If my shutter speed is too slow, my camera
will record movement and I will end up with an out of focus photo.
When? When your light is fading or you’re shooting
in a low light situation turn to your buddy ISO to help you out. Here is an example of using ISO within The
Exposure Triangle.
 |
| Test Shot |
 |
| Better Exposure |
Example: I am at the Friday night football game. Before my son takes the field I adjust my camera settings to my typical start point. It’s 7:00 p.m., the light is low, but the field is lit. I set my ISO first, to let’s say 800. Second, I set my camera to Shutter Priority and dial in a shutter speed of 1/500. I take a test shot and the aperture in my viewfinder is blinking at me or the image looks too dark. I check my aperture. According to the lens that I am using, the camera set the aperture to the largest opening that is available for that lens, so I leave the aperture alone. I could slow down the shutter speed to let more light in, but that may result in a blurry photo, so I leave the shutter speed alone. I turn to my friend ISO. I adjust the ISO of 800 up to 1600. Now I take my test shot again. Great, no blinking aperture and my image looks good! I can keep my camera settings here as long as the light does not change. When I notice the sun has gone down and my images begin to get a little darker I adjust the ISO again and so on.
Shooting Indoors vs Outdoors
I love to shoot outdoors, there is usually plenty of light
to work with during the day and I can leave my camera on Auto White Balance (AWB). My images are bright and colorful and very
similar to the way I see the scene with my own eyes. But, when I shoot inside,
say in the school gym, I get ugly greenish images that just don’t look
right. What’s going on?
This is called a Color Cast.
In a nutshell all light puts off a color cast according to the kind of
light it is or the color temperature of the light. Large gyms tend to use Fluorescent Lighting. Fluorescent
Light has a green color cast. We want
to Neutralize the color cast. We do this
by using the White Balance tool in our cameras.
Simply find the white balance button on your camera or in your menu and
set it to Fluorescent. The White Balance
tool will apply a magenta (pink) filter to your image as you take it. Magenta neutralizes Green!! Same goes for shooting on the football field
under the lights. The lights are usually
Tungsten which put off a yellow color cast.
I set my WB to Tungsten and my camera neutralizes the yellow with blue!
If you are shooting outdoors in the shade and see a blue
color cast on your images, set your WB to shade and the camera with use a
yellow filter to neutralize the color cast.
 |
| Strange Yellow/Orange Color Cast |
 |
| Color Cast Corrected with White Balance Adjustment |
Sometimes AWB- auto white balance, does a fantastic job of
determining the color cast on it’s own and using a filter to neutralize the
scene. But now you know what to do if
AWB isn’t getting it right and you need to eliminate a color cast!
What lenses are in your
bag?
There is a saying that “camera models come and go, but a
good lens lasts forever.” It’s
true. Camera change from year to
year. There are always new and better
features coming out. So my advice is buy the best camera you can afford and
then invest in glass. Let’s look in a
typical camera bag.
18-55mm 1:3.5-5.6
kit lens (kit lens means the lens that
came with your camera)
75-300mm 1:4-5.6
telephoto lens
Great! You have the
ability to shoot wide angle (18mm) and to shoot telephoto (300mm).
An 18-55mm lens is a great everyday lens. Great for capturing lifestyle images of your
family and dabbling a little in landscape photography.
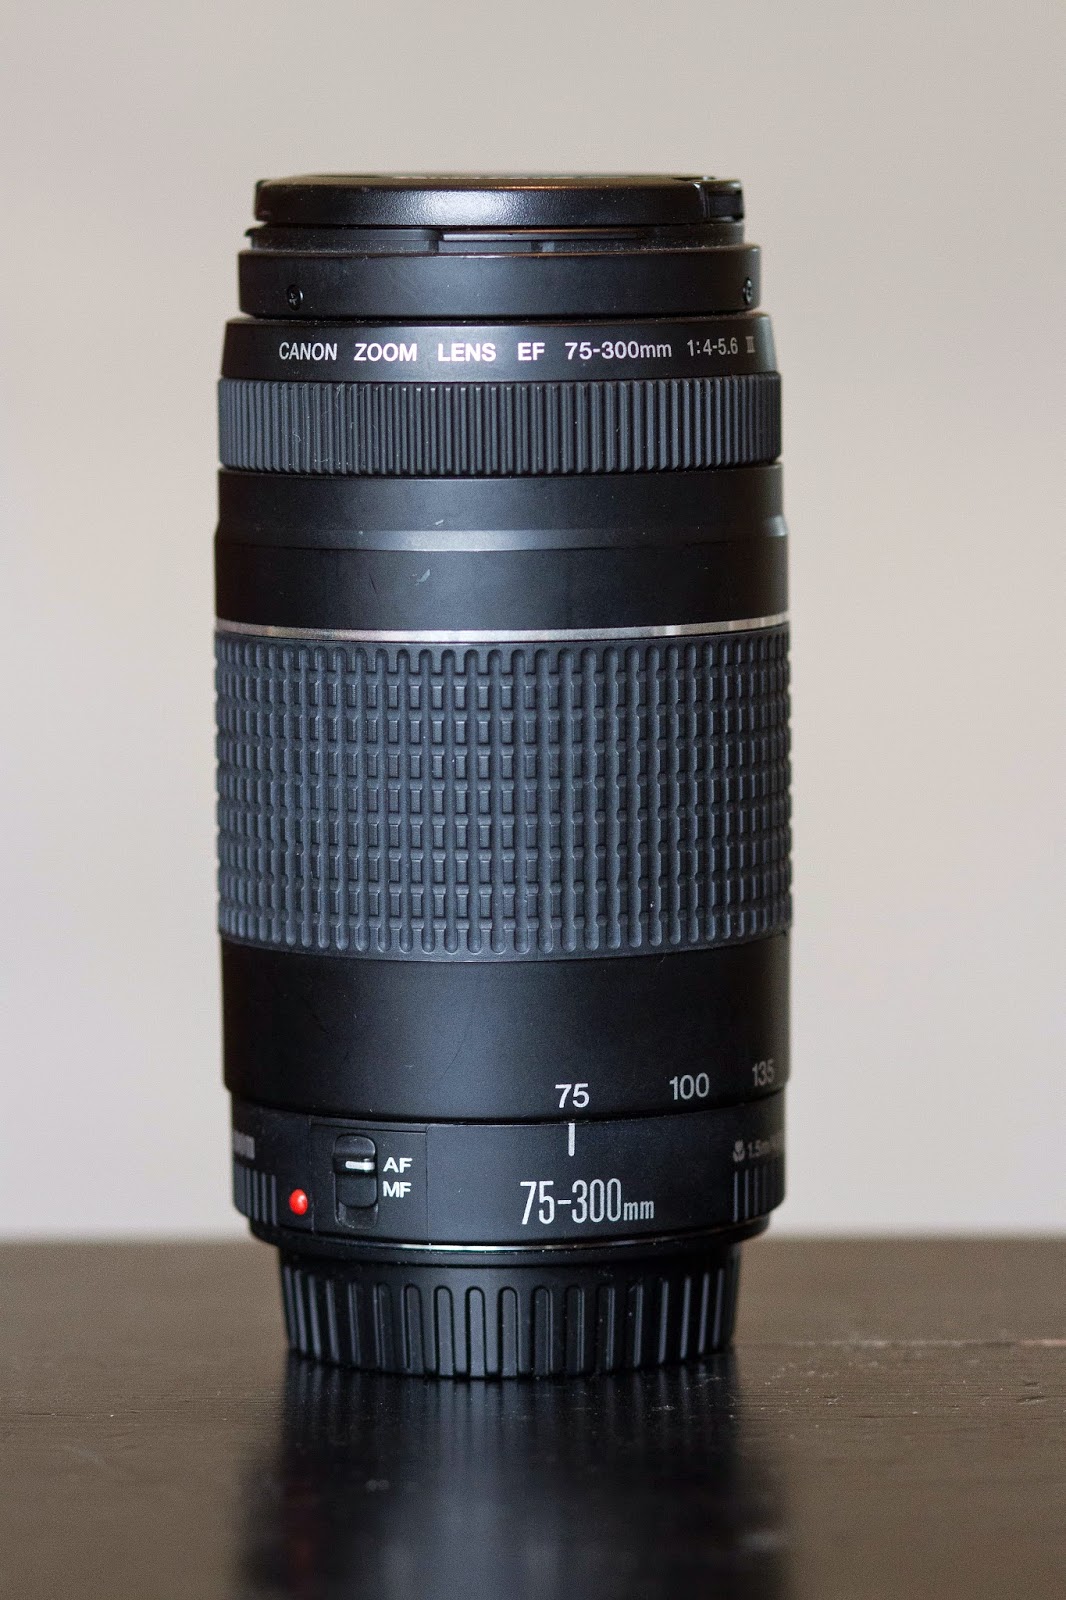 |
| Canon 75-300 1:4-5.6 Zoom |
The 1: stands for f /stop. An f/stop is another word for aperture. In the aperture world, large numbers are small openings (f22 is like a straw). Small numbers are large openings f1.8 is like the opening to a milk jug). Crazy, I know, but keep that in your head,
forever, k.
The 3.5 tells me that the maximum aperture this lens can
open up to is f/3.5, but only when it is not zoomed in at all. You must use the lens at 75mm to achieve
f/3.5.
-
The hyphen says, wait…there’s more!
The 5.6 tells me that the maximum aperture that this lens
can open up to is f/5.6 when the lens is fully zoomed in to 300mm.
The amount you zoom in between 75-300mm will result in different
maximum apertures, like f/4, etc.
The good news is you have some great lenses and can shoot a ton of different images with them.
The bad news is you will have problems in low light
situations that require a fast shutter speed, like sports.
So what is a girl to do?
Save A lot of Money… because here is a great lens for
shooting sports.
Canon EF 70-200mm f/2.8L IS II USM Lens $2299.00

Let’s dissect the
lens lingo a minute:
EF stands for Electro-Focus
70-200mm is the focal length of the lens
f/2.8 is the maximum aperture this lens will open up
to. Notice there is no hyphen after 2.8
and no other aperture value follows it?
This is a Fixed Aperture Lens. What this means is no matter if I am shooting
at 70mm, 100mm, 200mm, etc. I can ALWAYS open the aperture to the max. Yea! That means more light can enter my lens
when I am shooting in the evenings! More light means I can use a faster shutter speed!!
L stands for Luxury as in this is an expensive piece of
luxury glass! You will only find L on
top of the line Canon lenses.
IS stands for Image Stabilization.
II means this lens is a second generation. They’ve made improvements over the first gen
lens.
USM means it has an Ultra Sonic Motor. A fast and quiet motor to assist the lens
with focus.
The same lens for a
Nikon camera is the Nikon AF-S NIKKOR 70-200mm f/2.8G ED VR II Lens $2395.00
I know, I want one too, but the price was a little too steep
for me as well. So I went with a quality brand name lens for a little less
money. (Tamron and Sigma are the only other brands I trust)

LD Di SP Tamron AF 70-200mm 1:2.8 (IF) Macro
You will find all of the Lens Lingo for Tamron here http://www.lensdatabase.net/index.php?nav0=info&nav1=tamron
Basically, it’s the same focal length, the same fixed
aperture lens like the Canon and Nikon, but mine does not have image stabilization.
With Image Stabilization $1499.00 and without $769.00
I’ve shot sports, weddings, portraits, lifestyle, vacations,
you name it. I love this lens!!
It gives me the reach I need to shoot from afar. It gives my great depth of field when needed. It is a heavy lens, but it has a nice tripod mount bracket on it.
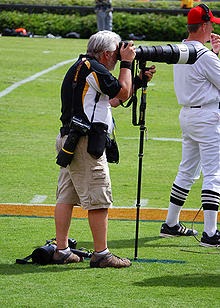
Speaking of Tripods, one of the best investments I've made for shooting sports is the Monopod.
It really takes the weight of the camera out of your hands and helps to steady the camera when shooting at longer focal lengths.
It is lightweight and compact. Mine collapses down to about 12 inches or so. I just toss it in the camera bag and take it with me to all the games.
I hope you were able to gleen alot from this post. If you learn to control your camera and really understand using the Exposure Triangle, you will find that you can apply these principles to many different photography subjects.
If you have any questions, please feel free to post them in the comment section.
Happy Shooting!
Jodie
Want to learn more? One on one or group lessons are available. email: jodie@jodiemphotos.com for more information.
It gives me the reach I need to shoot from afar. It gives my great depth of field when needed. It is a heavy lens, but it has a nice tripod mount bracket on it.
Speaking of Tripods, one of the best investments I've made for shooting sports is the Monopod.
It really takes the weight of the camera out of your hands and helps to steady the camera when shooting at longer focal lengths.
 |
| Photographer using monopod |
I hope you were able to gleen alot from this post. If you learn to control your camera and really understand using the Exposure Triangle, you will find that you can apply these principles to many different photography subjects.
If you have any questions, please feel free to post them in the comment section.
Happy Shooting!
Jodie
Want to learn more? One on one or group lessons are available. email: jodie@jodiemphotos.com for more information.
No comments:
Post a Comment